Interaktionen mit der Karte
Alle Beispiele bezieht sich auf MapEdit Version 23.2.142 und höher.
Karten Funktionen stehen ihnen über die Klasse "Map" zur Verfügung.
Die meisten der Funktion der Klasse "Map" stehen in MapEdit Desktop und Professional gleichermassen zur Verfügung.
Sie bekommen das Object Map z.B. mittels
this.Map
this.Project.Map
this.Application.Project.Map
Diese gibt ihnen die jeweils aktive Karte zurück. Beachten Sie das in MapEdit Desktop mehrere Kartenfenster möglich sind. this.Map gibt ihnen die gerade aktve Aktive zurück.
Highlighten von Featuren in der Karte
Beispiel in einem Dialog Plugin
 private void buttonHighlight_Click()
 {

     var features = this.Connection.ReadFeatures("BAUM", "ROWNUM<2");

     if (features.Count > 0)
     {
         this.Map.HighlightFeatures(features);

         //Oder ein einzelnes Feature highligten
         Feature feature = features[0];
         this.Map.HighlightFeature(feature);

         //Use this.Map.HighlightFeatureAsync if you need to wait till the Highlight is done

         //There are also several Optional options if you need them
         //MapHighlightFeatureOptions options = new MapHighlightFeatureOptions();
         //options.StrokeColor = XColors.Blue;
         //options.ZoomLevel = 18;
         //this.Map.HighlightFeature(feature, options);
     }
 }
UnHighlighten aller Feature in der Karte
this.Map.UnHighlightAllAsync();
Einen Layer aktualisieren/neu zeichnen
this.Map.RefreshLayer("BAUM"); //BAUM = Tabellename des Layers der aktualisisert werden soll.
Ein Feature in der Grafik wählen
Beispiel:
private async void ButtonSelecteFeatureInMap_Click()
{
   DbTableDefinition table = this.Schema.Tables["BAUM"];

   SelectFeatureResultArgs args = await this.Map.SelectFeatureAsync(table);

   if (args.Completed) //Aufruf war erfolgreich
   {
      string fid =  args.Feature.Key;
   }
}
Die Funktion SelectFeatureAsync hat mehrere Überladungen.
Hinweis: In MapEdit Desktop ist die Karte ein statisches "dummes" Bild in dem Millionen von Objekten liegen können. MapEdit Desktop weis zuerst einmal nicht welches Feature angeklickt wurde sondern benutzt die Koordinaten die angeklickt wurden um das Objekt in der Datenbank zu finden. D.h. wenn man bei Desktop nicht vorgibt in welcher Tabelle (und damit Datenbank) gesucht werden soll dann muss das Programm alles Tabellen und ggf alle Datenbanken durchsuchen, was sehr lange dauern würde. D.h. in MapEdit Desktop sollte die Tabelle immer vorgegeben werden.
In MapEdit Professional ist die Karte kein statisches Bild sondern hier sind wirklich die einzelnen Objekte in der Grafik anklickbar. D.h. die Grafik weis hier zu welcher Tabell eund Datenbank sie gehört.
Wenn Sie Code schreiben wollen der mit Desktop und Professional kompatibel ist, sollte sie immer die Tabelle als Parameter übergeben.
Hier ein mehr ausführliches Beispiel das zeigt welche Informationen Sie zurück bekommen.
  SelectFeatureResultArgs args = await this.Map.SelectFeatureAsync(table);

  if (args.Completed)
  {

      //Feature feature = args.Feature;

      FeatureContainer cnt = args.FeatureContainer;

      this.listBox.Items.Add("Connection: " + cnt.Feature.Connection);
      this.listBox.Items.Add("Table: " + cnt.Feature.Table.Name);
      this.listBox.Items.Add("Fid: " + cnt.Feature.Key);

      if (cnt.Feature != cnt.GeometryFeature)
      {
          //If the Feaurtue is a Utility Feature
          this.listBox.Items.Add("Geom Table : " + cnt.GeometryFeature.Table.Name);
          this.listBox.Items.Add("Geom Fid : " + cnt.GeometryFeature.Key);
      }

      if (cnt.Geometry != null)
      {
          this.listBox.Items.Add("Geometry:" + cnt.Geometry);
      }

      this.listBox.Items.Add("");
      this.listBox.Items.Add("Attributes:");
      foreach (var item in cnt.Feature.ColumnValues)
      {
          if (item.Value == null)
          {
              this.listBox.Items.Add(item.Key + "= NULL");
          }
          else
          {
              this.listBox.Items.Add(item.Key + "=" + item.Value.ToString());
          }
      }


  }
  else
  {
      //Reason why the Action was not Completed can be:

      if (args.Canceled)//User pressed cancel or aborted the Action
      {
          this.listBox.Items.Add("Canceled");
      }
      else if (!args.Succeeded) // An Error occured
      {
          this.listBox.Items.Add(args.ExceptionMessage);
      }
      else
      {
          //The User did not select a Feature?
          this.listBox.Items.Add("No Feature");
      }

  }
Features mittels aufziehen eines rechteckigen Bereiches in der Grafik wählen
DbTableDefinition table = this.Schema.Tables["BAUM"];
SelectFeaturesResultArgs args = await this.Map.SelectFeaturesAsync(table, Mum.Geo.Map.SelectionMode.Rectangle);
Den Anwender eine Geometrie in der Karte digitalisieren lassen
Mit diesen Funktionen wird der Anwender aufgefordert eine Geometrie (z.B. Linie) zu zeichen und es wird die Geometry zurück geliefert. Die Geometrie wird dabei nicht in der Grafik oder Datenbank gespeichert sondern der Entwickler entscheidet was er danach damit tun will.
Beispiel für Punkte
var args = await this.Map.GetPointAsync("Please Digitize Point");
if(!args.Canceled)
{
 string wktGeometry = args.Point.ToWKT();
}
args.Point liefert die Koordinaten im Lokalen Koordinaten System (z.B. UTM oder GK, etc)
args.MapPoint liefert die Koordinaten in Lat Long im Koordinatensystem EPSG:3857.
MapEdit verwendet intern EPSG:3857, das gleiche System wie Bing, Google Maps und OSM und viele andere.
EPSG:3857 und EPSG:4326 werden oft verwechselt weil beides Lat/Lon Koordinatensystem sind, diese liefren aber nicht die gleichen Koordinaten. Google Earth benutzt z.B. EPSG:4326.
siehe auch: https://wiki.openstreetmap.org/wiki/Web_Mercator
Benutzen Sie Mum.Geo.Application.CoordinateTransformation.Transform um Koordinaten zu transformieren. Siehe Beispiel unten.
Beispiel für Linien
var args = await this.Map.GetLineStringAsync("Please Digitize LineString");
if (!args.Canceled)
{
    string wktGeometry = args.LineString.ToWKT();
}
Beispiel für Flächen
var args = await this.Map.GetPolygonAsync("Please Digitize Area")
if (!args.Canceled)
{
    string wktGeometry = args.Polygon.ToWKT();
}
Wie kann ich Koordinaten in ein anderes System Transformieren.
Beispiel:
//Wenn Sie Koordinaten via den Map.GetXXX Funktioen holen
//erzeugen sie zuerst mit Clone eine Kopie der Geometry.

Geometry.Point geom = e.Point.Clone();

//Transformieren der Koordinaten

// Aktuellens Koordinaten System der Karte holen
string sourceEpsg = this.Application.Project.Map.SRS;

//Ziel System angeben
string targetEpsg = "EPSG:4326";

Mum.Geo.Application.CoordinateTransformation.Transform(sourceEpsg, targetEpsg, geom);

geom.SRID = 4326; //Die Funktion ändert nicht den SRID, das muss händisch gemacht werden.

//geom enthält danach die Koordinaten im Zielsystem.
Beispiel:
Geometry.Point geom = Meine Geometry

//Mum.Geo.Application.CoordinateTransformation.Transform(quell System, Ziel System, geom);

Mum.Geo.Application.CoordinateTransformation.Transform("EPSG:26911", "EPSG:4326", geom);

geom.SRID = 4326; //Die Funktion ändert nicht den SRID, das muss händisch gemacht werden.
Ab Version 25.1.100 gibt es auch die Extension "TransformTo" Funktion.
Es muss dazu die Mum.Geo.Cient.Core.dll eingebunden sein.
Beispiel:
using Mum.Geo.Client; //WICHTIG!! Wenn dieser Namespace nicht angegeben wird dann findet C# die Extension nicht.

public class MyClass
{

   public void Test()
   {

     Mum.Geo.Geometry.Point p = new Geometry.Point();
     p.SRID = 26911; //Srid bzw EPSG
     p.X = 663319.10;
     p.Y = 3997472.72;

     p.TransformTo(4326); //Transformiere nach EPSG/SRID 4326

     //Achtung: Die Property SRID der Geometry wird bei dieser Funktion
     //automatisch auf das Zielsystem gesetzt.
     //Also in dem fall auf 4326.

     //Es empfiehlt sich vorab einen Clone (kopie) der Geometrie zu erzeugen
     //wenn man die alte Geometry und deren Koordinatensystem beibehalten will
     //Mum.Geo.Geometry.Point p2 = p.Clone();

   }
}
Redline Layer
Einen Redline Layer hinzufügen
private void buttonAddRedlineLayer_Click(object sender, EventArgs e)
{
    Mum.Geo.Map.MapRedlining redLining = this.Map.Redlining;
    List<string> layers = new List<string>();
    layers.Add("MyRedline/Layer1010");
    redLining.AddLayers(layers, this.AddRedlineLayersCompleted);

}

private void AddRedlineLayersCompleted()
{
    //
}
Redline Layer entfernen
private void buttonRemoveRedlineLayer_Click(object sender, EventArgs e)
{
 Mum.Geo.Map.MapRedlining redLining = this.Map.Redlining;

 List<string> layers = new List<string>();
 layers.Add("MyRedline/Layer1");
 layers.Add("MyRedline/Layer2");
 layers.Add("MyRedline/SubLayer1/Layer1");
 layers.Add("MyRedline/SubLayer1/Layer2");
 layers.Add("MyRedline/SubLayer2/Layer1");
 layers.Add("MyRedline/SubLayer2/Layer2");
 layers.Add("MyRedline/Layer3");
 layers.Add("MyRedline/SubLayer1");
 layers.Add("MyRedline/SubLayer2");
 layers.Add("MyRedline");
 redLining.RemoveLayers(layers, null);
}
Auf Redline Layer zeichnen
  Mum.Geo.Map.MapRedlining redLining = this.Map.Redlining;

  redLining.ActiveRedlineLayerName = "MyRedline/Layer2";

  redLining.DrawStyleLine.StrokeColorName = "AliceBlue";
  redLining.DrawStyleLine.StrokeThickness = 20;
  Mum.Geo.Geometry.LineString line1 = new Mum.Geo.Geometry.LineString();
  line1.Add(3431235.346, 5792442.015);
  line1.Add(3438226.445, 5796557.177);

  //draws a line on the active redline layer and return key
  string elementKey = redLining.DrawLineString(line1);

  //elementKey the elementKey can be used to identify the object,
  //for eaxmple to delete it later with
  //redLining.ActiveRedlineLayerName = "MyRedline/Layer2";
  //first set the layer that contains the element
  //redLining.RemoveItem(elementKey)
  //if the element is not in the active layer it will not be deleted.
  //if u delete more than one element use "RemoveItems"
  //and remove them all at the same time to avoid multips refresh/redraws of the map

  //Draw features via sql, the first column has to return he Geometry
  redLining.DrawStyleLine.StrokeColorName = "red";
  redLining.DrawStyleLine.StrokeThickness = 4;
  redLining.DrawLineString(_connection, "select geom from LOI where rownum<10", this.DrawStrassenCompleted);
WMS Layer hinzufügen
this.Map.PrivateLayers.AddWMSLayer("My WMS Layer2", "your url template", null);
Zoom Level und Mittelpukt der Karte ermitteln
 int zoomlLevel = (int)this.Map.ScaleLevel;
 Mum.Geo.Geometry.Point p = this.Map.GetMapCenterPoint();
Layer ein und aus schalten
//Always use SwitchLayerBegin/SwitchLayerEnd
//This creates better performance, otherwise each of the switches cause a Redraw for each Layer separate
this.Map.SwitchLayerBegin();
this.Map.SwitchLayerOn("LasVegas\\Water\\Pipe");
//Sets the Checkbox of a Layer/Group and all its Parent Groups to ON
//Notice that if the Layer is not visible in the Current Scale, this will set the checkbox to on but will not display the layer until the
//User zooms to the Scale where the Layer is visible.
//
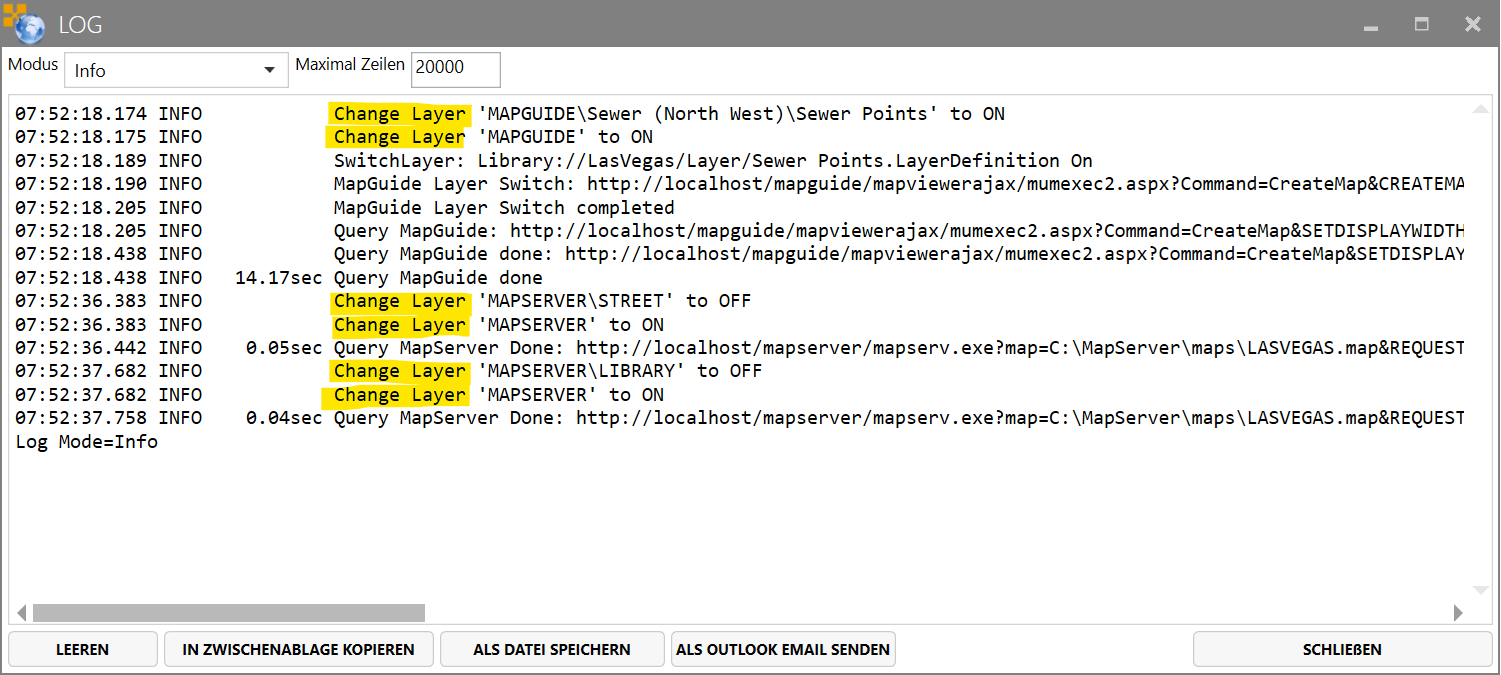
//To get the full Layername open the Log Window of the Client and then manually turn the Layer that you want ON or OFF.
//In the Log File you will then see a Entry that starts with "Change Layer" where you see the Full Internal Name of the Layer that you need to use.
//Example: Change Layer 'MAPGUIDE\Bus\Bus Stops' to OFF
//If you only want to set the Checkbox of the Layer to ON but not change the status of the Parent Groups
//then use this:
this.Map.SwitchLayerOn("LasVegas\\Water\\Pipe", false);
//To Turn off a Layer use this.
this.Map.SwitchLayerOff("LasVegas\\Water\\Pipe");
//This is the old API Command that can also be used.
//Here Groups and Layername are separated in single strings
this.Map.SwitchLayer(true, "LasVegas", "Water", "Pipe");
this.Map.SwitchLayerEnd();
Layer Status abfragen
Benutzen Sie die Funktion "IsLayerVisible" um herauszubekommen ob ein Layer ein- oder ausgeschalten ist.
bool status = this.Map.IsLayerVisible("MAPGUIDE\\Bus\\Bus Stops");
Wie bekomme ich den Layernamen?
Um den vollen Layernamen zu bekommen öffnen Sie das Log Fenster (Oben links im MapEdit Client Menu).
Schalten Sie dann den Layer im Baum händisch ein oder aus.
Im Log Fenster sehen Sie dann einen Eintrag "Change Layer" und dahinter den vollen Layernamen.
Entfernen Sie dabei das führende und endende Anführungszeichen.
Beachten Sie das in C# das Backslashzeichen in einem String durch zwei Backslashzeichen ersetzt werden muss!